
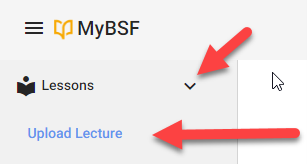
If you have been granted access to the lecture upload feature, you will find it in the dropdown menu just below the “Lessons” item
Lesson/Date selection
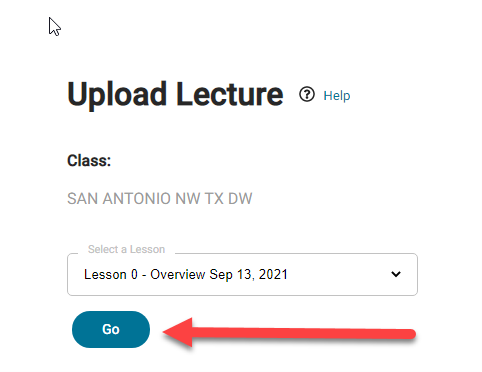
- When you click on that menu item, the lecture date / lesson number selection option appears. It will display the lesson number/date that is on or after but before your next class date. You may select any lesson or date you want. The lesson numbering and dates are based on your class calendar.
Lecture upload steps
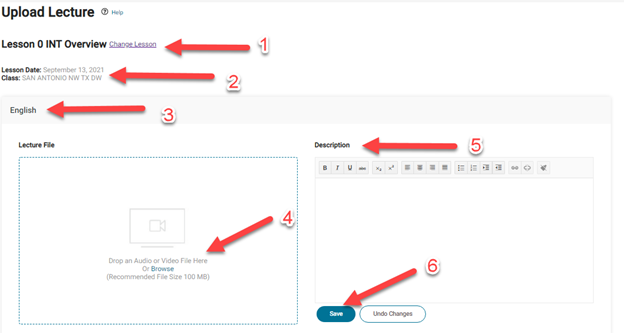
- The lesson number and title, based on your class calendar and your selection of lesson/ndate on the prior step will display here. Make sure it is correct. Change to the correct lesson/date BEFORE you add a lecture recording and an outline.
- Double check lesson date (this is the class meeting date)
- The language displayed here is the base language for the class. The lecture will display no matter what spoken language the user has selected.
- You can drag and drop the lecture file OR use the browse button to locate the file on your device.
- The “Description” is for the outline of the lecture and class announcement. The text will display with the lecture on the members lesson page. You can use the area below to create your outline or copy and paste and existing document content. Note that you can also include links to external web pages or resources if needed.
- Make sure that you save your work. Also, you can make changes or add an outline without having to upload the lecture again. Enter the text and click save and the outline content will be updated on your members lesson page.
Checking Lecture Status
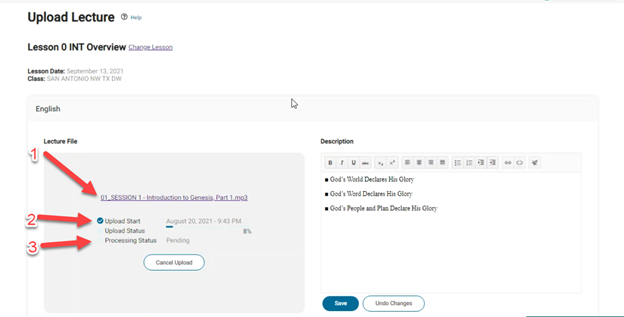
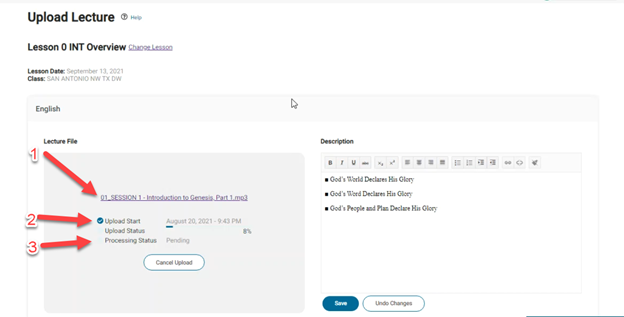
- The name of your uploaded file will display during and after the upload
- The Start time, and Status will display the progress of your upload
- When the lecture has been received and processed the updated status will display(“Pending” will change to “Processing” which will change to “Completed”)
When the upload is complete and the processing is complete you will see the updated status:
At this point it would be a good idea to view the uploaded lecture by navigating to the lesson page and view/play the lecture to verify all is well.
The lecture will be available during the entire study year. If, for some reason, the lecture needs to be replaced for ANY lesson, you can select the lesson/date (the first step in this document) and you can replace the lecture, the outline, or both at any time.
LECTURE UPLOAD TIPS
- If you encounter a problem with the upload, please make at least one additional attempt to upload the file.
- Check the overall size of your lecture file. A good quality, compact audio recording should be around 20 MB. A video recording should be 300MB or less. This size allows for a quick upload and processing as well as ease of playback. NOTE: Most members are on mobile devices where a high-definition video is not necessary. The file size you upload will be the file size that is available for download so keep the lecture video file as small as possible. If you happen to have an SDG that requires a high-definition file for projection, you may want to arrange to transfer the file to the SDG through a different medium (Dropbox, etc)
- If you are getting a “Session Time Out” message when you attempt to upload the lecture, your internet speed is not sufficient to upload the file. /n Test your speed at the www.testmyspeed.com website (or a similar website). Your upload speed needs to be >1.0 MB. If it is not, ask another leader to attempt the upload. /n If upload speed cannot be increased, you may be able to upload a reduced file size. To reduce file size, see the W 200 Lecture Administration Manual.
- If the processing status remains as “Pending” for an extended period of time (more than an hour) it is possible an error has occurred. Try uploading again. /n STILL UNSUCCESSFUL? UTILIZE THE CHAT FUNCTION AT THE BOTTOM OF YOUR SCREEN.